ShopDreamUp AI ArtDreamUp
Deviation Actions


Description
Note:
I have a minor update on processor_ship, that cpu/gpu temp meter. If you are using it, pls download zip again. Thanks.
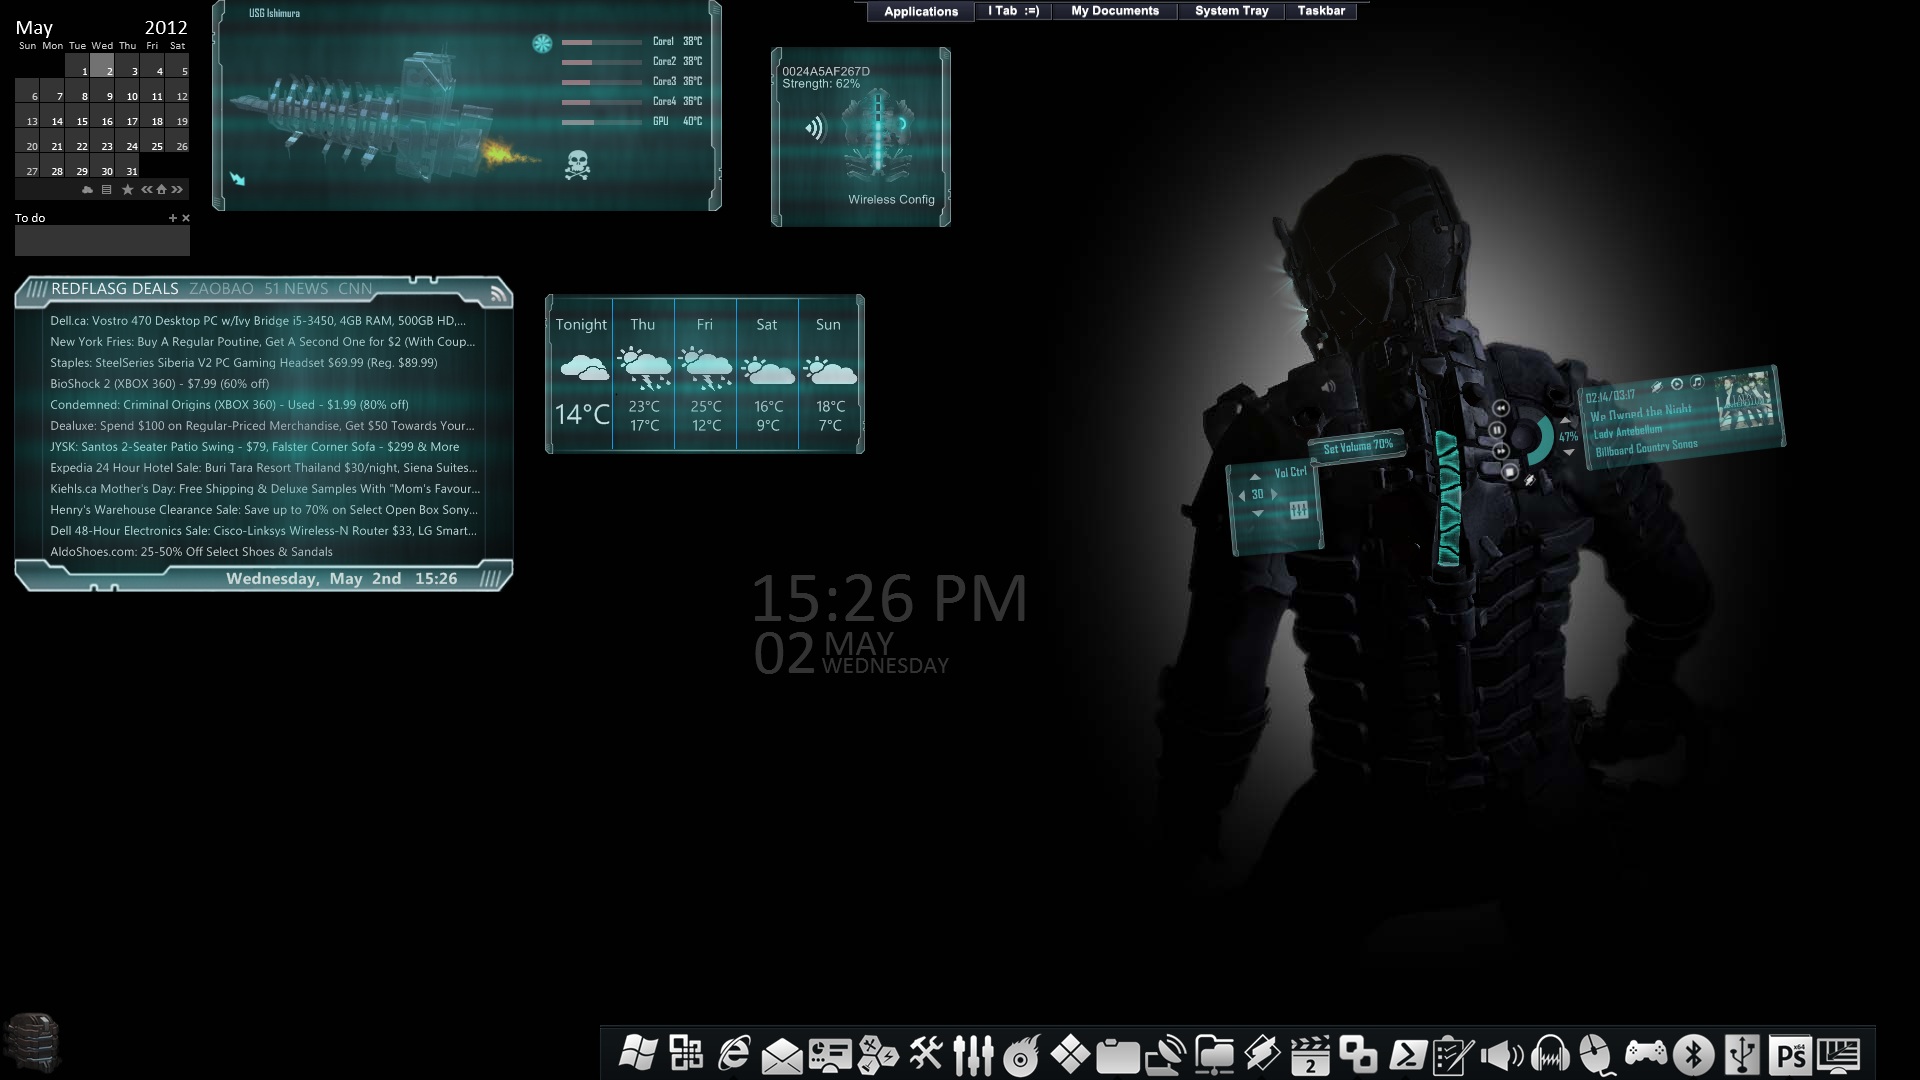
After more than a month hard work, dead space rig skin v3 is finally here. Thanks for the reply on my screen shoot posted earlier, to let me know some people are waiting for it. It kind of push me to have it done regardless so many difficulties I face lately. Believe or not, this is my best shoot. My work, family all demanding me and I guess I will do only minor update and maintainence on it for a while.
It's a Fri, when you come home and open computer, wondering what to do for the weekend, hopefully this give you a bit of fun.
I don't have time to do a video demo this time. But too many things I want to say about this skin. It has a lot of features. I will leave it to you to find out I guess.
Well, at least I put together a readme file, it's in the zip as well. You can skip the rest of post, it's just a opcy from readme.
------------------readme--------------------------------
Dead Space II Rig armor suite rainmeter theme
author-louiezzz
url-[link]
Pls support me by download, try it on, Fav if you like it, and leave comments/advise, appreciate it.
1. install
install rainmeter 2.2
unzip pkg under skin dir
reload rainmeter to recongize new skins unzipped
use the wallpaper in pkg, rig_wp.jpg. It's 1080p by default. Pls don't stretch it. Try use ps to give a new canvas for your size and copy past from the jpg file.
for lifebar, the main skin, load battery_rig.ini or any other .ini, you can switch between diff mode. Once load, right click the helmet, the skin will position itself to right place (1080p only).
for engbar, the main skin, load cpu.ini or any other .ini, you can switch between diff mode. Once load, right click the energy bar plate, the skin will position itself to right place (1080p only).
for processor_ship, load processor_ship_mini.ini, you can switch between rest of modes by switch icon.
speedfan is required for temp measure. afterburner is required for gpu/gpu mem measure.
2. feature of lifebar
lifebar has 12 mode in total. They are
battery/gpu/gpu mem/sys mem/cpu/wifi/media player/hdd1/hdd2/cpu&gpu temp/volume control/quick launcher(4grp)
for general
-----------------
left click on helmet to launch jump panel, you can swtich to any mode by click icon in panel.
when mouse move over helmet, it will highlight itself and launch a panel for detail infor about each measurement depends on the mode.
on left/right should, there are two big bolt, they can highlight when you mouse move over them. Left click to swtich to previous(left) and next(right) mode.
the life bar, has 10 cell, presents 10 percent of whatever it measure. It goes up and down. Under 50% cell become yellow. under 20 cell become red.
Individial mode
----------------
I am not going into detail for each one, only special function mention here.
Battery mode, left click rig icon to launch engery setting.
Gpu mode, left click rig-icon to launch nvidia control panel, radon gpu pls update meanually
Sys mem mode, left click rig-icon to launch sys monitor.
wifi mode, left click rig-icon to launch network control.
media player mode. volctrol button is for plaer volume. There are 3 player you can choose by click icon (winmedia player/winamp/itune). The albumn cover area you can click to launch the player.
hdd1 mode, left click rig-icon to open c:.
hdd2 mode, left click rig-icon to open config panel, you can enter the drive letter you want to monitor. right click rig-icon to open the drive.
cpu/gpu temp mode. left click rig-icon to launch speedfan. in control panel, left/right arrow to switch between 1-4 cpu core, for the rig bar to measure. Icon in middle to launch temp monitor. 3 icon you can click to set it to 4/2/1 core accroding to your cpu.
volume control mode. left click rig-icon(speaker or mute) to mute and unmute. The rig cells each presents 10% of vol. When your mouse move over a cell, it tells you the vol level it presents. Click on one cell to jump to its vol setting. In control panel, left/right arrow to swtich between vol output device. Up/down arrow to increase/decrease vol by 10%. Numver in middle is current vol. The right side icon to launch sys vol control.
quick launch mode. It has 4 group of link(url/app/folder/game). each of 10 rig cell presents a link. When your mouse move over rig cell, it shows the link it presents. left click rig-icon to launch config panel, there you can update link target(url/app/folder/game), name and icon. In control panel, left/right arrow to swtich between link group.
3. feature of energy bar.
energy bar has 8 mode total. They are
cpu/sys mem/gpu mem/gpu/wifi/hdd1/hdd2/media player.
for general
-----------------
left click energy bar plate, will launch jump panel, you can swtich to any mode by click icon in panel.
left/right click rig icon to switch to prev/next mode.
mouse over rig icon, a panel will show a bit more detail about the meausre depends on current mode.
Individial mode
----------------
hdd2 mode, middle button click rig icon to launch config panel, you can input the 2nd hdd letter that you want to monitor.
media player mode. volctrol button is for plaer volume. There are 3 player you can choose by click icon (winmedia player/winamp/itune). The albumn cover area you can click to launch the player.
I have a minor update on processor_ship, that cpu/gpu temp meter. If you are using it, pls download zip again. Thanks.
After more than a month hard work, dead space rig skin v3 is finally here. Thanks for the reply on my screen shoot posted earlier, to let me know some people are waiting for it. It kind of push me to have it done regardless so many difficulties I face lately. Believe or not, this is my best shoot. My work, family all demanding me and I guess I will do only minor update and maintainence on it for a while.
It's a Fri, when you come home and open computer, wondering what to do for the weekend, hopefully this give you a bit of fun.
I don't have time to do a video demo this time. But too many things I want to say about this skin. It has a lot of features. I will leave it to you to find out I guess.
Well, at least I put together a readme file, it's in the zip as well. You can skip the rest of post, it's just a opcy from readme.
------------------readme--------------------------------
Dead Space II Rig armor suite rainmeter theme
author-louiezzz
url-[link]
Pls support me by download, try it on, Fav if you like it, and leave comments/advise, appreciate it.
1. install
install rainmeter 2.2
unzip pkg under skin dir
reload rainmeter to recongize new skins unzipped
use the wallpaper in pkg, rig_wp.jpg. It's 1080p by default. Pls don't stretch it. Try use ps to give a new canvas for your size and copy past from the jpg file.
for lifebar, the main skin, load battery_rig.ini or any other .ini, you can switch between diff mode. Once load, right click the helmet, the skin will position itself to right place (1080p only).
for engbar, the main skin, load cpu.ini or any other .ini, you can switch between diff mode. Once load, right click the energy bar plate, the skin will position itself to right place (1080p only).
for processor_ship, load processor_ship_mini.ini, you can switch between rest of modes by switch icon.
speedfan is required for temp measure. afterburner is required for gpu/gpu mem measure.
2. feature of lifebar
lifebar has 12 mode in total. They are
battery/gpu/gpu mem/sys mem/cpu/wifi/media player/hdd1/hdd2/cpu&gpu temp/volume control/quick launcher(4grp)
for general
-----------------
left click on helmet to launch jump panel, you can swtich to any mode by click icon in panel.
when mouse move over helmet, it will highlight itself and launch a panel for detail infor about each measurement depends on the mode.
on left/right should, there are two big bolt, they can highlight when you mouse move over them. Left click to swtich to previous(left) and next(right) mode.
the life bar, has 10 cell, presents 10 percent of whatever it measure. It goes up and down. Under 50% cell become yellow. under 20 cell become red.
Individial mode
----------------
I am not going into detail for each one, only special function mention here.
Battery mode, left click rig icon to launch engery setting.
Gpu mode, left click rig-icon to launch nvidia control panel, radon gpu pls update meanually
Sys mem mode, left click rig-icon to launch sys monitor.
wifi mode, left click rig-icon to launch network control.
media player mode. volctrol button is for plaer volume. There are 3 player you can choose by click icon (winmedia player/winamp/itune). The albumn cover area you can click to launch the player.
hdd1 mode, left click rig-icon to open c:.
hdd2 mode, left click rig-icon to open config panel, you can enter the drive letter you want to monitor. right click rig-icon to open the drive.
cpu/gpu temp mode. left click rig-icon to launch speedfan. in control panel, left/right arrow to switch between 1-4 cpu core, for the rig bar to measure. Icon in middle to launch temp monitor. 3 icon you can click to set it to 4/2/1 core accroding to your cpu.
volume control mode. left click rig-icon(speaker or mute) to mute and unmute. The rig cells each presents 10% of vol. When your mouse move over a cell, it tells you the vol level it presents. Click on one cell to jump to its vol setting. In control panel, left/right arrow to swtich between vol output device. Up/down arrow to increase/decrease vol by 10%. Numver in middle is current vol. The right side icon to launch sys vol control.
quick launch mode. It has 4 group of link(url/app/folder/game). each of 10 rig cell presents a link. When your mouse move over rig cell, it shows the link it presents. left click rig-icon to launch config panel, there you can update link target(url/app/folder/game), name and icon. In control panel, left/right arrow to swtich between link group.
3. feature of energy bar.
energy bar has 8 mode total. They are
cpu/sys mem/gpu mem/gpu/wifi/hdd1/hdd2/media player.
for general
-----------------
left click energy bar plate, will launch jump panel, you can swtich to any mode by click icon in panel.
left/right click rig icon to switch to prev/next mode.
mouse over rig icon, a panel will show a bit more detail about the meausre depends on current mode.
Individial mode
----------------
hdd2 mode, middle button click rig icon to launch config panel, you can input the 2nd hdd letter that you want to monitor.
media player mode. volctrol button is for plaer volume. There are 3 player you can choose by click icon (winmedia player/winamp/itune). The albumn cover area you can click to launch the player.
© 2012 - 2024 louiezzz
Comments51
Join the community to add your comment. Already a deviant? Log In
Amazing, thanks.